
Life in the City: How Do I Store All My Gear?
April 08, 2020
8 min read
The harder it is to find or access a piece of outdoor gear, the less it will get used. It's that simple.
GEAR STORAGE AND ORGANIZATION
The question of “where to put what.”
It’s a common issue for many city-dwelling outdoor enthusiasts.
Where do I store my sleeping bags? Where can I fit all 4 pairs of skis? What am I supposed to do with all these camping pads? What about all my small stuff I always lose?
Should I sacrifice my damage deposit by putting a nail in this wall to hang something up?
Okay, that last one is something that will ALWAYS be debated in the minds of all renters throughout the rest of time, but for the other questions, I hope I can help.
Not everyone lives in an apartment, but these concepts can apply to anyone who is short on space, regardless of living circumstance.
Let’s get organized.
CHANGE IS HARD…
Recently, my wife and I moved into “the big city”…
Seattle.
Due to the much higher rent prices in the city, our new apartment was about 1/3 the size of our old house.
Most of my life, I’ve had the luxury an abundance of space to store my outdoor and mountaineering gear, so downsizing from a suburban house to a small, city apartment was a bit of an adjustment for me. By itself, the size wasn’t a big deal; in fact, I enjoy the thought of a small minimalist place for many reasons!
But there was a problem we didn’t anticipate, and it became pretty obvious right away….
Between the two of us (and all our outdoor hobbies), we have just a bit of gear…
Like, a BIG bit.
It had never been a problem in prior homes, since we had a large two-car garage and tons of space inside the house.
But here we were, newly-minted city dwellers, in a tiny apartment with no garage and really no storage capacity to speak of, aside from a couple small “closets.” Our apartment is advertised as a two-bedroom, but in classic city-style, the “second bedroom” is essentially a square box that measures 9 feet long and 9 feet wide.
(I personally think calling this a second bedroom is a joke, considering that a twin bed would fill over half the space…)
For us, it would serve as our new home office, instead. It also served as the dumping grounds for all our outdoor gear.
Not a pretty sight.
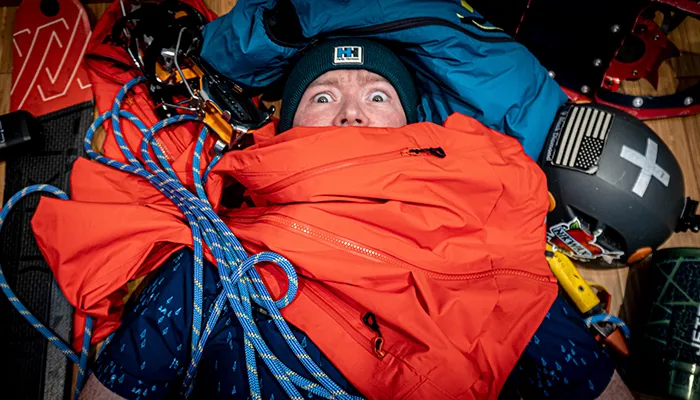
After several months of constantly emptying out the contents of our big plastic gear bins onto the floor, in search of a certain item or two, and growing increasingly more frustrated that we never knew where anything was because of the chaos, I had enough…
I sat down and analyzed this “space” problem we had, and realized that a there was a solution that would not only solve the problem of our unorganized and chaotic gear storage, but also make the office space look like an area we actually wanted to spend time in.
Now, all this begs the question: “WHY DOES GEAR ORGANIZATION REALLY MATTER? I KNOW WHERE ALL MY STUFF IS.”
Sure…. sure you do.
Let’s face it….
The harder it is to find or access a piece of outdoor gear, the less it will get used.
It’s that simple.
Keeping your outdoor gear accessible and organized will save you time, frustration, headaches, and in many cases, even money.
Anyone ever excitedly purchase a new piece of gear only to realize a month later that you already owned basically the same thing, but had forgotten it existed because you hadn’t seen it in 9 months?
Yeah.
Gear that is shoved in the back of a closet, stored in piles, or lazily tossed up into your rafters will all-but-guarantee that it gets less action.
The best gear is the gear you actually use.
The best ability is availability.
And accessibility.
KEEPING YOUR OUTDOOR GEAR ACCESSIBLE AND ORGANIZED WILL SAVE YOU TIME, FRUSTRATION, HEADACHES, AND IN MANY CASES, EVEN MONEY.
THE BEFORE
To start off with, here’s what we already had at our place:
- a dresser (for holding all of our outdoor clothing)
- a desk for the home office
Beyond that, everything else was randomly and haphazardly scattered around in boxes, bins, and bags.
Yikes.
We did have a wall rack for skis that had been a carryover from our last place, so that helped.
The small closet in the room was semi-organized, but it was a functional nightmare, with inefficient use of space.
SIDENOTE: THE CLEANSE
So…
Before any of the organizing actually happened, there’s an important step that is not immediately apparent in the pictures below…
And that step is THE CLEANSE.
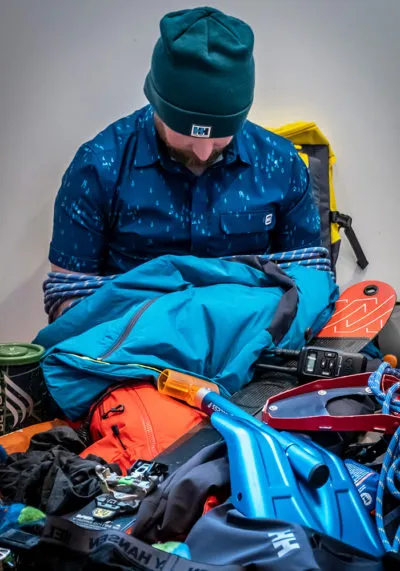
To do a proper cleanse, you need to go through everything you have and pull out the items you no longer use or need.
Literally… Every. Single. Thing.
We were both heavily into the outdoors before we started living together, so we noticed there were duplicates of some things. Sometimes multiple duplicates.
It made sense to tackle that problem first.
We are huge fans of Marie Kondo, so we used her famous method of laying out absolutely every item we had to go through it one item and one category at a time, in order to say goodbye to some things.
We discovered that we had a ton of stuff that we truly didn’t need to keep anymore.
Lots of unexpected surprises kept popping up… like, “How do we have four different water filters!?”
We used this approach and it worked great, so we would highly recommended going through your own items with a discerning eye and looking for things that may fall into one of these categories:
- Gear that is no longer used because it has been replaced by something else. “Hey, it’s nothing personal…”
- Gear you haven’t used or worn in over a year. “Let’s be real…”
- Outdoor clothing that no longer fits, or is past its prime. “Retirement is not the end… but merely a new beginning.”
- Items you may be attached to for sentimental reasons.* “We’re not moving on, but rather moving through…”
*[Parting ways is such sweet sorrow… for me, it was my first backpack, which was completely unusable but was kept around because I had a ton of memories attached to it.]
For the redundant pieces, we either sold them, donated them, or gifted them to friends.
Cleansing solved a good portion of the space problem, and it felt great to help others who benefitted from receiving our extra gear. As an added bonus, the extra bit of cash we had from the gear we sold more than covered the minimal cost of acquiring the few storage materials we would need going forward.
A true win-win!
Now, let’s take a deeper look into the organization details…
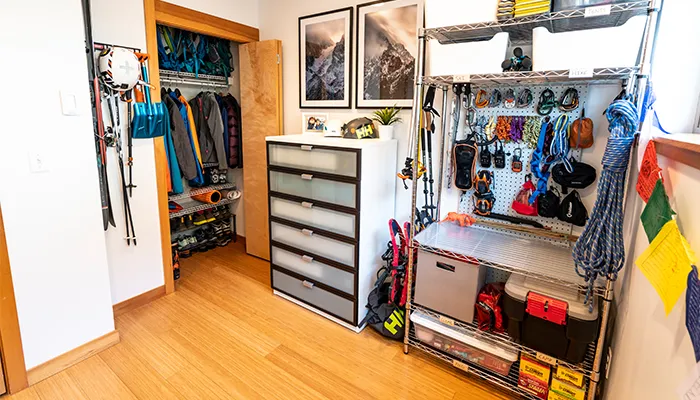
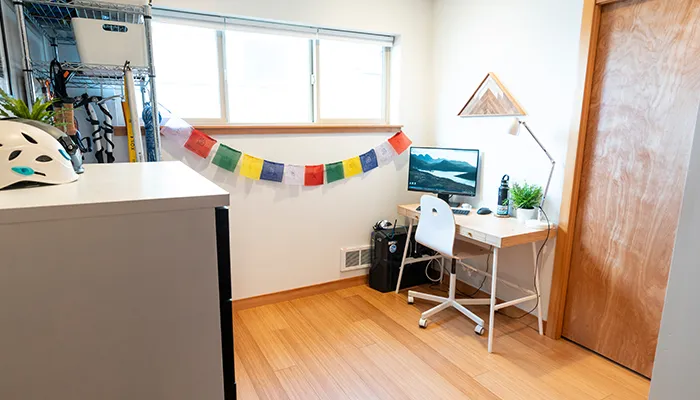
THE AFTER
WIRE SHELVING AND PEG BOARD
I decided to go with the classic wire shelving unit for its versatility and the ability to see everything at once.
It’s a true organizational hero.
I also love that I can set the shelves to the exact spacing that I want, and the endless attachment possibilities of the wire, for hanging all sorts of gear.
Pro tip: This shelf unit cost me $60 at Target. Be aware that some places (like The Container Store, where I first checked…) wanted to charge over $200 for the exact same thing! This is absolutely ridiculous, there’s no reason why it should ever cost that much, so just do some shopping around to make sure you aren’t overpaying.
After the shelving unit, I bought another classic gear organizational tool… the simple pegboard.
I found it at Home Depot for $22.
Most people mount these directly to the wall, but I opted to use zip ties to hang the board from the back of the shelving unit, because I was unsure where exactly in the room I wanted to place everything. Now, whenever I move the wire shelving unit, the peg board comes with it!
So easy.
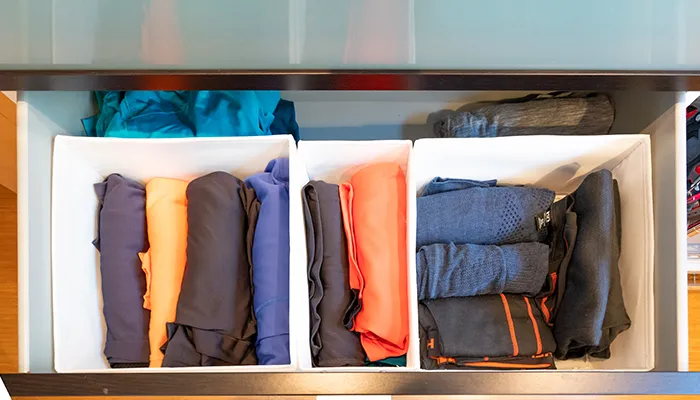
the dresser
To help increase efficiency with the dresser, I bought a couple packs of those little IKEA zip-up boxes (called the SKUBB box – they go for $5 for a set of 6).
These little cubes are so helpful in keeping everything organized and neatly packed, and this is especially true with outdoor clothing, since there are so many small items like neck gaiters, gloves, hats, sunglasses, etc.
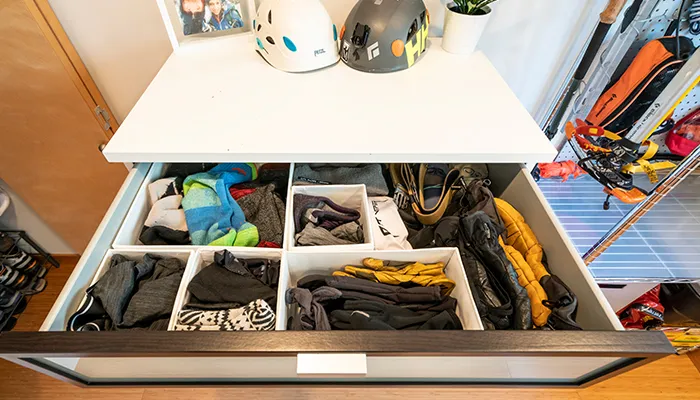
With the help of the organizational power of the cubes, and all that donating of unused clothing we had done, we were able to completely free up the bottom two drawers.
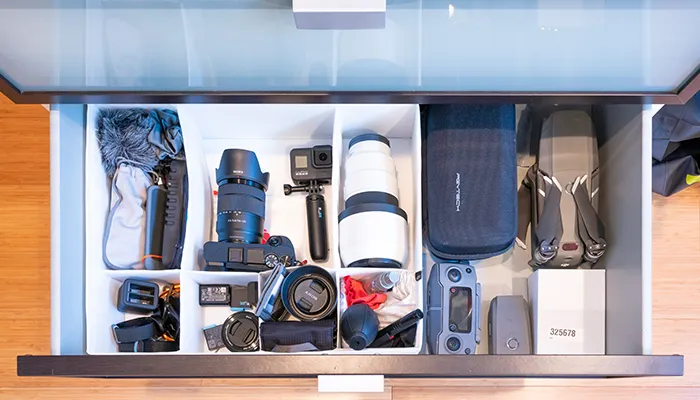
Those two drawers are now where I keep all of my camera equipment!
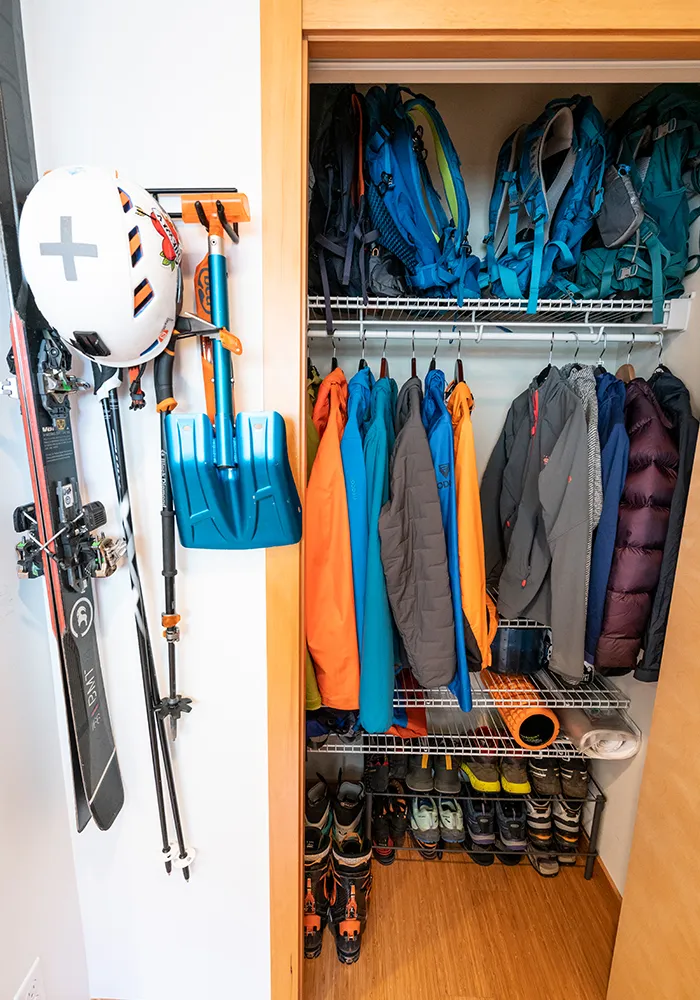
the closet
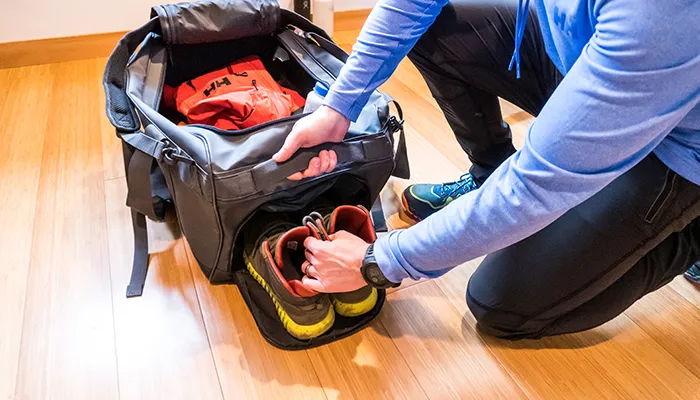
Thankfully, the closet in the room already had shelving inside it; the only thing I bought was a shoe rack from Target for $24, which allowed me to relocate our boots from the shelves to the floor.
With the newly-freed shelf and rail space, I added in our insulators, coats, and a bunch of other miscellaneous gear & random items we don’t often use, like a bear can, duffel bag, extra Nalgene bottles, etc.

One category we couldn’t quite find a solution for was our backpacks…
Between the two of us, we have more backpacks than can fit in that tiny closet.
The solution was keeping the two packs that we will use the most for whichever current season we are in, and relocating the other packs into another closet, elsewhere in the house.
Not perfect, but it’s a good compromise.
HOW WE CATEGORIZED
After a few different iterations of figuring out the best possible way to group all of our gear, we decided to go with an approach focused on each specific outdoor activity.
So, other than apparel, all equipment needed for a day spent backcountry skiing was in one box, while everything I would need for a day hike was in another box, etc.
This created a good system from a couple angles… A) With the necessary items all in one bin, it was now harder to accidentally forget a crucial item and B) it was also quick & easy to gather everything together before a trip, and easy to deposit all of it back in its proper bin, afterwards.
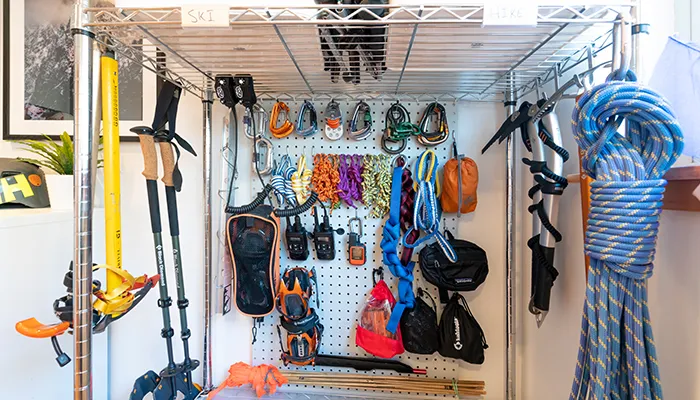
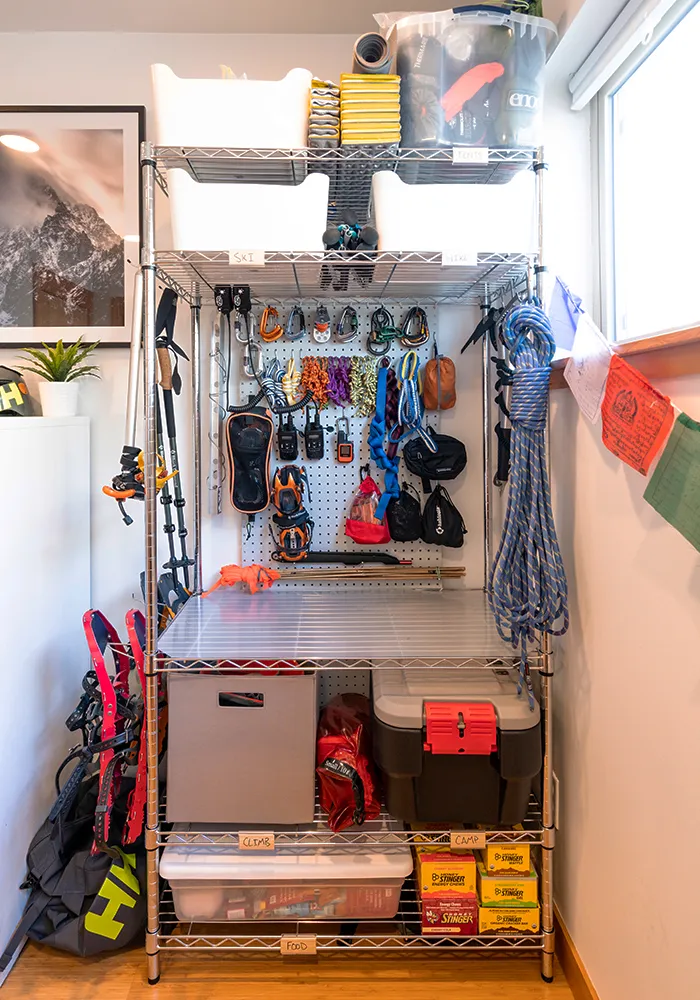
The breakdown of our wire shelving system ended up being this:
- Top Shelf: The box on the left contains extra consumable supplies like large refill bottles of bug spray and sunscreen, blue bags, etc. The container on the right contains tents, sleeping pads, bivy sacks, and stuff sacks.
- 2nd Shelf: Ski box on the left with everything needed for a day spent backcountry skiing and a hike box on the right for everything needed for a day spent hiking.
- Middle Shelf: Climbing and mountaineering equipment hung on the peg board, with ice axes, pickets, snow shoes, wands, and rope hung on the sides with hooks. Plastic sheet on the bottom to rest gear on while I’m collecting it to go into my pack.
- 4th Shelf: More climbing gear in the left box for bulky items like harnesses, chalk bags, large runners, etc. and a camp box on the right which has everything needed for overnights like stoves, water filters, lighting, etc.
- Bottom Shelf: Food box, where I store all of the freeze dried meals, gels, bars, instant coffee, etc. I tend to buy these items in bulk when things go on sale, so it’s cheaper and I always have a good supply to choose from the night before some mountain fun.
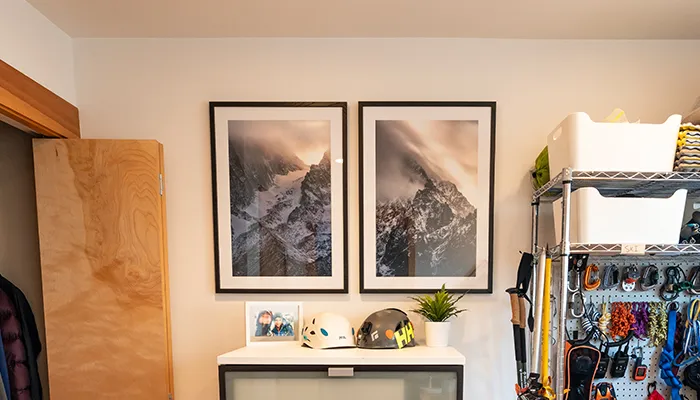
LASTLY… ADDING SOME CHARACTER
Since this room also functioned as our home office where we spend quite a bit of time, it was important that it be not only functional, but that it felt and looked good, as well.
I added things like a couple prints of my prints to the wall, some prayer flags from Nepal, and a mini wooden mountain made by Nick Terrel.
Life is too short to have bland spaces.
Make it functional.
But make it you.
SUMMARY
All in all, this organization system was fairly cheap to implement.
Total costs ran about $100, which as I noted before, was completely covered by the money we made selling a few pieces of redundant gear.
With the minor costs and relatively low effort required, I am very happy with how it all turned out!
I imagine we will shift things around here & there over time, but the important part is that our gear room (and as a byproduct, our apartment!) finally feels like home and a place that I get genuinely excited to be in.

Written by Nate Brown. All images by Nate Brown, except header image c/o The Wild Outsiders.
learn more about nate
Explore more blogs
July 18, 2025 6 min read
From business executive to ocean warrior: Scott Shawyer's Be Water Positive mission
Meet Scott Shawyer, the Canadian skipper preparing to take on The Ocean Race Europe 2025 while advocating for global water conservation.
July 15, 2025 5 min read
The Ocean Race Europe 2025 sets sail
Explore the Ocean Race Europe 2025—key dates, cities, and Helly Hansen’s role as the Official Clothing Partner.